Pull-down, Pull-out Hose
Hey there, we’re sorry to hear that you’re having issues with your Pfister faucet. We know it’s frustrating when something doesn’t work how it’s supposed to, but the good news is that there may be an easy fix to get you back up and running.
Review the information below and follow the links to find your specific model if you need to figure out what parts you need to order. And if at any point you feel lost, don’t hesitate to contact our customer service reps to help walk you through it.
Frayed or Kinked Hose
My pull-down or pull-out hose is frayed, kinked, or has another issue.
My nylon hose is frayed at the end where it pulls out of the faucet tube
Identify the issue
Identify your pull-down or pull-out faucet
Call Pfister
Call us at 1-800-
Send us your question.
One of our service representatives will be happy to make sure you get a replacement hose to fix the frayed or kinked one that is a problem today.
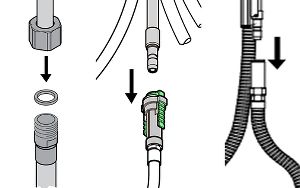
Disconnect my pull-down or pull-out Hose
I want to disconnect my pull-down or pull-out kitchen faucet hose
Disconnecting the hose
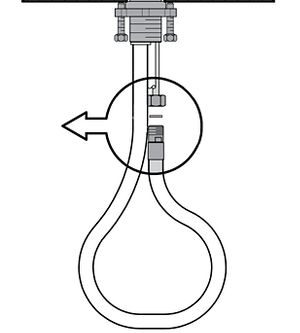
To disconnect underneath the cabinet, determine hose type
Disconnect nylon hose quick-connect, and Identify the quick-connect type
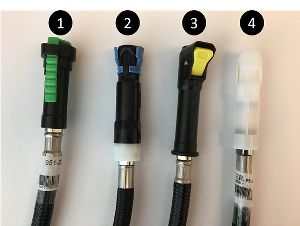
If you have a version with a quick-connect on this end of the hose, removal is easy. There are 4 major types that we use pictured to the right. Choose the one that most closely resembles yours and follow the steps to disconnect it.
Disconnecting Under the Cabinet - Type 1
For type 1 / green tabs: push up on the assembly towards the faucet as if you are installing it. Simultaneously pull the green tabs down towards the floor - this relieves pressure on the collet holding the connector in place and allows you to remove it. Now pull the whole assembly down towards the floor and it will slide off.
Remove the black and green quick connector from the hose by twisting it counter-clockwise. Save this part for later.
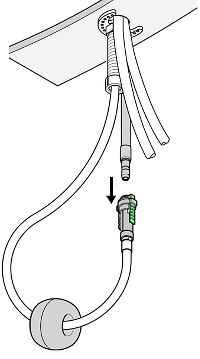
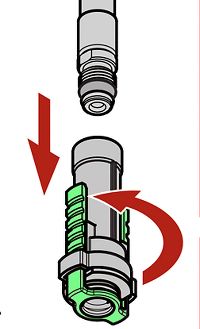
Disconnecting Under the Cabinet - Type 2
For type 2 / blue tabs: pinch the blue tabs on the quick connector towards each other while pulling down on the assembly until it comes off.
Remove the black and blue quick connector from the hose by twisting it counter-clockwise. Save this part for later.
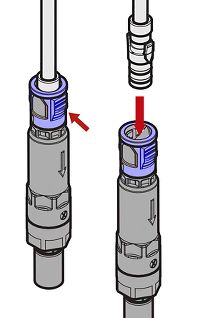
Disconnecting Under the Cabinet - Type 3
For type 3 / yellow tab: depress the yellow tab while pulling down on the assembly until it comes off.
Remove the black and yellow quick connector from the hose by twisting it counter-clockwise. Save this part for later.
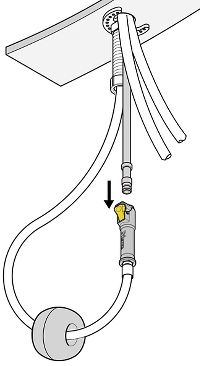
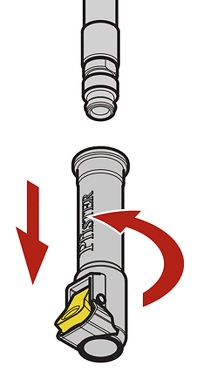
Disconnecting Under the Cabinet - Type 4
For type 4 / white connector: push the connector up towards the underside of the sink as if you’re installing it, next pinch the two white tabs on the side of the top of the connector while simultaneously pulling down towards the bottom of the cabinet until it comes off.
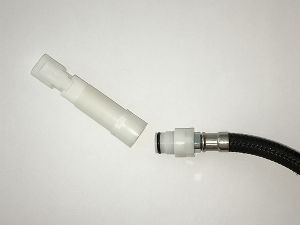
Remove the white quick connector from the hose by twisting it counter-clockwise. Note: Some older versions of this piece have two parts and may initially come apart as shown to the right. If that happens, simply remove the second piece and reconnect it to the quick connect assembly. Save this part for later.
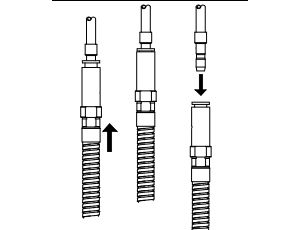
Disconnect metal hose quick connect
Disconnect threaded type
Remove the weight
Loose Weight
Fixed Weight
If your faucet uses a fixed weight--where it is attached to the hose--find the specific type that yours is below and follow the instructions to remove.
Fixed Weight - Type 1
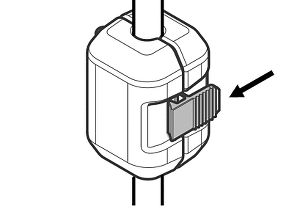
For the fixed weight type pictured to the right, depress the gray tab and slide to the right to disengage the latch. The weight is hinged in the back and will open like a book. Save the weight for later.
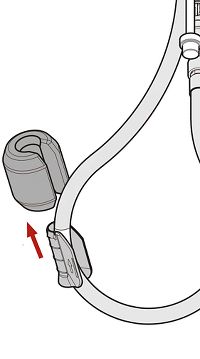
Fixed Weight - Type 2
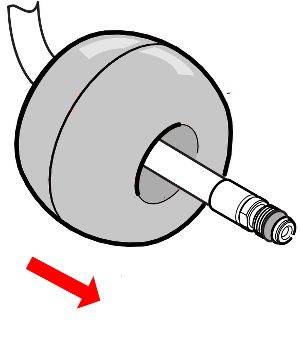
For the fixed weight type pictured to the right, grab the weight and slide it upwards while holding on to the hose - it is held in place by friction and should come off with little effort. Slide the cradle off of the hose. Save the cradle and weight for later.
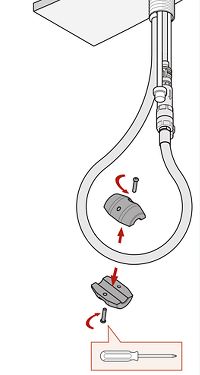
Fixed Weight - Type 3
For the fixed weight type pictured to the right, remove the two screws using a #2 Philips screwdriver as shown and the weight will separate into two halves. Save the weight and screws for later.
Fixed Weight - Type 4
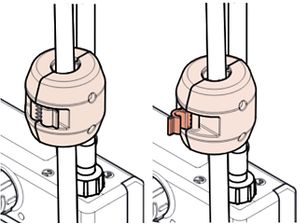
For the fixed weight type pictured to the right, lift the tab to unlock the clasp. The weight is hinged at the back and will open like a book. Save the weight for later.
Pull hose through faucet
Remove sprayhead
My pull-down or pull-out kitchen hose is leaking just behind the sprayhead
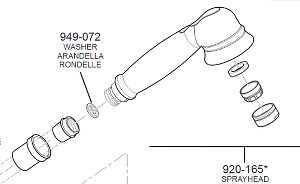
Remove the Sprayhead
Check for washer
One step that each pull-down and pull-out installation should include is the removal of the sprayhead to flush the lines of sediment and debris before running it. Some models house gaskets and screens in the ball joint assembly and they occasionally fall out prior to reattaching the sprayhead.
If you've just installed your faucet and see a leak in this area, check for the presence of this part. Flat washers are especially common in connectors like the one to the right, which include a metal housing.
Check ball joint
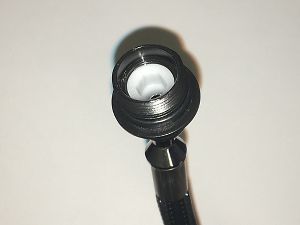
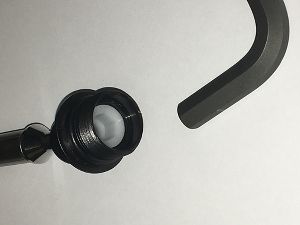
It doesn't happen often, but some newer model hose assemblies can get loose over time due to the continual movement of the ball joint.
If you have one of these pictured to the right and water is coming from this area, check to make sure the white piece with the hexagonal hole is securely in place. A #8 metric allen wrench fits this piece and turning to the right hand-tight is all you need.
Call Pfister
Call us at 1-800-PFAUCET (1-800-732-8238) or
Send us your question (Link to "Ask a Question" Page)
In the meantime, you can speed up your call experience by using our online catalog search tools on this website to identify your product - just click on "kitchen" on the menu at the top of the page. Tip: if your kitchen faucet is more than 5 years old, toggle the "show discontinued" button to make sure you are seeing every relevant style. We have many hoses and providing your service representative the faucet style name or model number will speed up your call.
My pull-down or pull-out kitchen hose is leaking underneath the cabinet
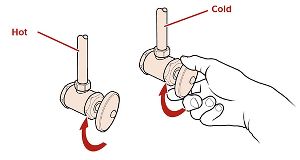
Turn off the water
Call Pfister
Call us at 1-800-PFAUCET (1-800-732-8238) or
Send us your question (Link to "Ask a Question" Page)
In the meantime, you can speed up your call experience by using our online catalog search tools on this website to identify your product so that we can get you the right part - just click on "kitchen" on the menu at the top of the page. Tip: if your kitchen faucet is more than 5 years old, toggle the "show discontinued" button to make sure you are seeing every relevant style. We have many hoses and providing your service representative the faucet style name or model number will speed up your call.
If you need to replace a part...
Find your faucet to view a full parts list
View all possible matching faucets to find your specific model. Then view the full parts diagram to identify the correct part numbers to order.
Contact us to help ID your faucet for you.
If you’re not sure what to do next, send us a photo of your faucet and we’ll identify it for you. We can usually get you an answer within 24hrs.
No Common Models Found
Consumer Service1-800-PFAUCET
(1-800-732-8238)
7:00am to 4:00pm PST, Mon-Fri
6:30am to 2:30pm PST, Sat
Closed Sunday and major holidays

